10 Best Benjakitti Forest Park Photo Spots for Your Feed
Benjakitti Forest Park is a green oasis in the heart of Bangkok. It offers a stunning contrast between nature and tall skyscrapers. Photographers love this location for its unique urban views. You can find many free nature spots in Bangkok right here.
This massive park was once a tobacco factory site. Now it serves as a vital wetland for the entire city. The design focuses on sustainability and local biodiversity. It has quickly become a favorite spot for social media creators.
Exploring this park requires some planning to find the best angles. The layout features several distinct zones with different visual styles. This guide will help you find the most photogenic locations. Get your camera ready for an amazing outdoor adventure.
Introduction to Benjakitti Forest Park
Learn more at Lonely Planet Bangkok.
To plan your trip, review Bangkok Metropolitan Administration.
The park is located in the busy Khlong Toei district. It covers a vast area of over four hundred rai. The recent expansion has added beautiful forest and wetland zones. It is now one of the largest parks in Bangkok.Visitors can enjoy miles of walking and cycling paths. The park design mimics a natural forest ecosystem. This creates a peaceful atmosphere away from the city noise. It is a perfect place for both relaxation and creativity.
The architecture of the park is modern and functional. Elevated walkways allow you to see the wetlands from above. These structures provide excellent vantage points for your photos. You can learn more at our main travel guide.
10 Best Benjakitti Forest Park Photo Spots
Finding the right angle is easy in this expansive park. The design features layers of trees and calm water. Most spots are accessible via the wide elevated walkways. These paths provide a bird's-eye view of the wetlands.
Plan to spend several hours exploring the different zones. Each area offers a distinct photographic style for visitors. You can even walk to how to visit Lumpini Park from here. The connecting bridge is a photo spot itself.
Be sure to bring a wide-angle lens for the landscapes. A portrait lens is also great for lifestyle shots. The park is very popular on weekend afternoons. Try visiting on a weekday for fewer crowds.
- The Elevated Skywalk Forest Path
- Type: iconic sight and walkway
- Why go: amazing views of the forest
- Best for: dramatic wide-angle shots
- Where: central forest zone area
- Time: thirty to sixty minutes
- Cost: free for all visitors
- Getting there: walk from the entrance
- Tip: visit during the golden hour
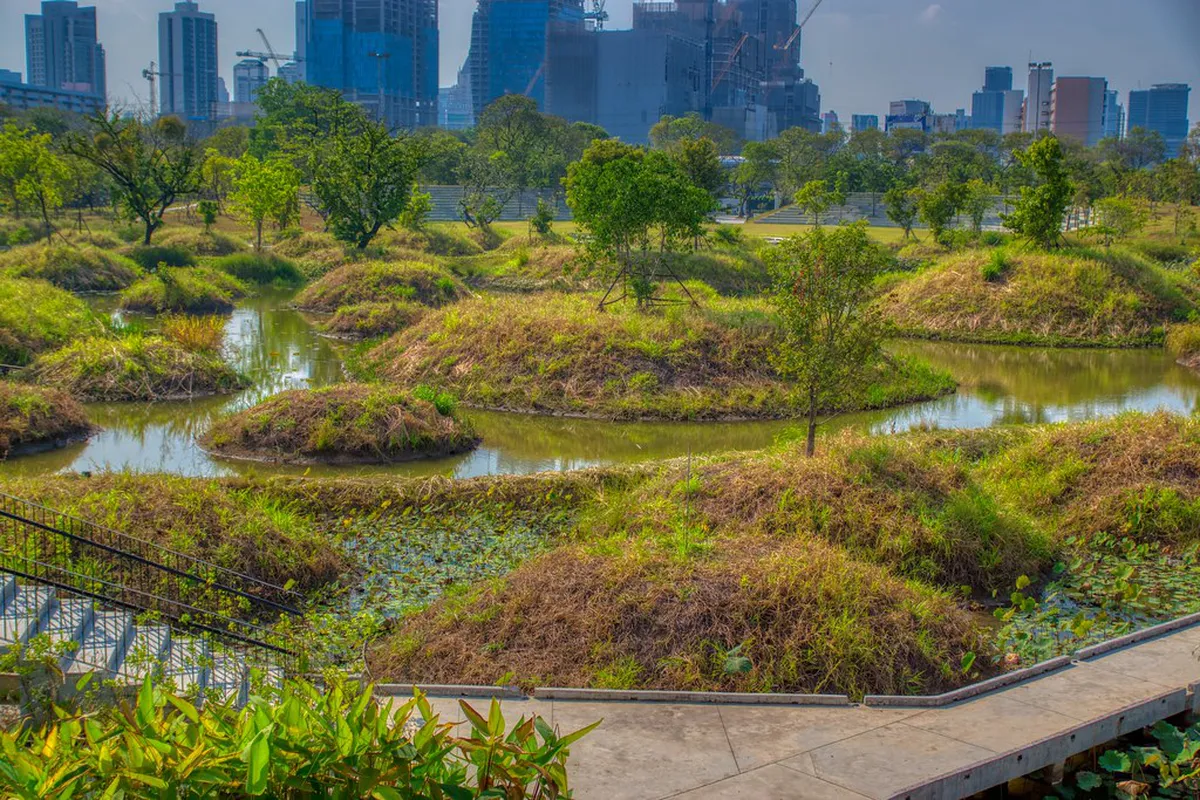
- The Wetland Island Clusters
- Type: nature and landscape spot
- Why go: unique circular island designs
- Best for: drone-like perspective shots
- Where: lower wetland garden section
- Time: twenty to forty minutes
- Cost: free entry for everyone
- Getting there: follow the ground-level paths
- Tip: wear comfortable walking shoes
- Sukhumvit Skyline Viewpoint North
- Type: viewpoint and urban vista
- Why go: perfect city skyline backdrop
- Best for: sunset city photography
- Where: north side of reservoir
- Time: fifteen to thirty minutes
- Cost: no cost for entry
- Getting there: near the Ratchadaphisek entrance
- Tip: use a tripod for night
- The Sunken Seating Area
- Type: unique architectural feature
- Why go: sit level with the water
- Best for: creative low-angle portraits
- Where: near the central amphitheater
- Time: ten to twenty minutes
- Cost: always free to access
- Getting there: central park walking path
- Tip: watch for water reflections
- The Historic Green Bridge
- Type: iconic elevated walkway
- Why go: connects two major parks
- Best for: industrial and local vibes
- Where: north-west corner of park
- Time: forty-five minutes total
- Cost: free public walkway access
- Getting there: follow the elevated signs
- Tip: great for street photography
- The Outdoor Grass Amphitheater
- Type: unique local experience
- Why go: massive tiered grass seating
- Best for: group photos and events
- Where: eastern edge of park
- Time: twenty minutes of time
- Cost: free for general use
- Getting there: east entrance near parking
- Tip: check for evening performances
- The Blooming Lotus Ponds
- Type: nature and floral spot
- Why go: colorful blooming water lilies
- Best for: macro nature photography
- Where: southern wetland boundary area
- Time: fifteen to thirty minutes
- Cost: free to visit daily
- Getting there: walk south from skywalk
- Tip: visit in early morning
- The Forest Canopy Walkway
- Type: nature and experience
- Why go: walk among the treetops
- Best for: lush green backgrounds
- Where: western forest zone area
- Time: thirty minutes of walking
- Cost: free for the public
- Getting there: access via skywalk ramps
- Tip: look for local birds
- The Geometric Circular Pond
- Type: iconic sight and symmetry
- Why go: perfect geometric water feature
- Best for: minimalist photography style
- Where: near the main reservoir
- Time: ten to fifteen minutes
- Cost: free entry for visitors
- Getting there: main path from entrance
- Tip: use a wide lens
- The Main Reservoir Perimeter
- Type: iconic sight and path
- Why go: classic Bangkok park views
- Best for: skyline reflection shots
- Where: perimeter of large lake
- Time: forty minutes for loop
- Cost: free to access daily
- Getting there: main entrance near MRT
- Tip: great for cycling photos
Best Time for Photography in the Park
Timing is everything for the best photos in Bangkok. The light is softest during the early morning hours. You should arrive right when the park opens. This helps you avoid the intense midday heat.
Sunset offers another great window for photography. The city lights begin to twinkle against the sky. This creates a magical atmosphere for long exposures. The park stays open until late in the evening.
Check the best time to visit Queen Sirikit Park for more tips. Both parks share similar lighting conditions throughout the year. Rainy season can also provide dramatic cloudy skies. Just be prepared for sudden tropical downpours.
How to Reach Benjakitti Forest Park
Reaching the park is very simple using public transit. The MRT Blue Line is the most convenient option. Get off at Queen Sirikit National Convention Center station. Exit number three leads directly toward the park.
You can also take the BTS Skytrain to Asok. From there, it is a short walk or bike. The park is very accessible from the Sukhumvit area. Taxis and ride-shares can drop you at the entrance.
There is limited parking available for private cars. It is better to use public transport on weekends. The park gates are easy to find from the road. Security guards can help with basic directions.
If you enjoy biking, consider a Bang Krachao cycling itinerary for more adventure. Both locations offer great paths for outdoor enthusiasts. Cycling is a popular way to see the park. Bikes are allowed on designated paths only.
Essential Tips for Visiting Bangkok Parks
⭐ Recommendation: Don't miss out on amazing Bangkok tours - book now!
Always carry plenty of water while exploring the park. The humidity in Bangkok can be quite high. Drink often to stay hydrated and energized. There are small kiosks selling drinks near the gates.
Wear sunscreen and a hat for sun protection. Most of the skywalk has very little shade available. Lightweight clothing will keep you cool while walking. Mosquito repellent is also useful in the evenings.
Respect the local rules regarding photography and drones. Commercial shoots usually require a special permit. Always be mindful of other people enjoying the space. Keep the noise levels low in the forest zones.
You can compare these rules to Wachirabenchathat Park rental prices and regulations. Most public parks in Bangkok follow similar guidelines. Check official signs for the latest updates. Staff are usually helpful if you have questions.
Many people also enjoy visiting how to get to Chulalongkorn Centenary Park for modern designs. It is another great spot for urban photography. Bangkok has many green spaces worth exploring. Each park offers a unique perspective of the city.
Frequently Asked Questions
What are the Benjakitti Forest Park opening hours?
The park is open daily from 5 AM until 9 PM. Entry is completely free for every visitor. This wide schedule allows you to capture both sunrise and sunset shots easily during your trip to Bangkok.
How do I get to Benjakitti Forest Park by train?
Take the MRT Blue Line to the Queen Sirikit station. Use exit three to reach the park entrance quickly. This is the most convenient way to travel for photographers carrying heavy camera gear and tripods.
Are drones allowed for Benjakitti Forest Park photo spots?
Drone use requires a legal permit from the Thai authorities. You must also obtain permission from the park management team. Flying without these documents can lead to very heavy fines or legal trouble during your stay.
Benjakitti Forest Park is a must-visit for any photographer in Bangkok. The mix of modern architecture and lush wetlands is truly unique. You will find endless inspiration along the elevated skywalks. Plan your visit today to capture the beauty of this urban forest.
Remember to respect the environment while taking your photos. Stay on the paths and take your trash with you. Enjoy the peaceful atmosphere of this incredible city park. Your social media followers will love the stunning results.